
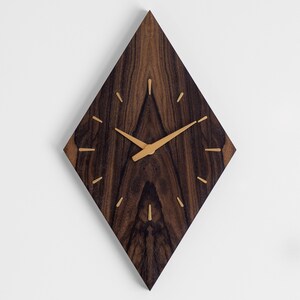
A diy wood wall clock is a simple and stylish way to add a personal touch to your home decor. With just a few materials and basic woodworking skills, you can create a unique timepiece that complements your aesthetic.
Whether you prefer a rustic farmhouse look or a sleek modern design, there are endless possibilities for customization. From selecting the type of wood and stain to choosing the size and shape of the clock face, you can tailor the project to suit your taste.
This beginner-friendly project is not only a fun way to express your creativity, but it also offers a practical and functional addition to any room. So why not give it a try and create your own diy wood wall clock today?

Credit: www.amazon.com
Choosing The Perfect Wood For Your Clock
When choosing the perfect wood for your diy wood wall clock, it’s important to understand the different types of wood available. One factor to consider is the aesthetics of the wood. Each type of wood has its own unique grain pattern and color, so select one that matches your desired style.
Another factor to keep in mind is durability. Some woods, like oak or maple, are more resistant to wear and tear, making them ideal for a clock that will be used frequently. Additionally, consider the sustainability of the wood. Opt for eco-friendly options such as reclaimed or responsibly sourced wood.
Lastly, think about the cost and availability of the wood. Ensure that you choose a wood that fits within your budget and is readily accessible. By considering these factors, you can ensure that you select the perfect wood for your diy wood wall clock.
Essential Tools And Materials
Here is a list of essential tools and materials for your diy wood wall clock project. The tools you will need include a jigsaw, sandpaper, a drill, a ruler, and a screwdriver. In addition, you will also need a wood board, clock mechanisms, clock hands, and adhesive.
To source these materials, you can check your local hardware stores or online marketplaces such as amazon or ebay. Make sure to choose a high-quality wood board that suits your desired design and size for the clock. When purchasing the clock mechanisms and hands, ensure they are compatible with the size of your clock face.
Take your time to compare prices and read customer reviews to make informed decisions. A well-equipped toolbox and quality materials will help you create a beautiful diy wood wall clock that adds a touch of elegance to your space.
Step-By-Step Instructions For Building Your Clock
When building a diy wood wall clock, start by preparing the wood for the clock face. Cut the wood into your desired shape, ensuring it fits your design. Next, create the numbers or hour markers for the clock face, adding a personal touch.
Assemble the clock hands and mechanism accurately, ensuring they are aligned and functional. Finally, mount the clock securely on the wall, considering the location and height for visibility. Following these step-by-step instructions, you can create a unique and stylish wood wall clock that adds charm to any space.
Personalizing Your Wood Wall Clock
Personalizing your wood wall clock can be done by adding a stained finish, which enhances the natural beauty of the wood. To achieve a unique look, you can experiment with different painting techniques. Incorporating additional decorative elements will further enhance the clock’s aesthetic appeal.
By exploring various options, you can create a personalized wood wall clock that perfectly matches your style and adds a touch of uniqueness to your living space. So, get creative and make your diy wood wall clock a stunning focal point in your home.
Maintaining And Caring For Your Clock
Maintaining and caring for your clock is essential to ensure its optimal condition and longevity. To keep your diy wood wall clock in top shape, here are some helpful tips. Regularly dust the clock with a soft cloth to prevent dirt and debris buildup.
Avoid exposing the clock to direct sunlight or extreme temperature changes, as this can damage the wood and affect the clock mechanism. If you notice any issues with the clock mechanism or hands, such as them not moving properly or becoming loose, it may be necessary to replace them.
Fortunately, replacing the clock mechanism or hands is a straightforward process that can easily be done with the help of a few basic tools and a replacement kit. By following these maintenance practices and being proactive in addressing any issues, you can enjoy a beautiful and functional diy wood wall clock for years to come.
Showcasing Your Diy Wood Wall Clock
Showcasing your diy wood wall clock is a great way to add a personal touch to your home decor. Whether you prefer a rustic or modern style, there are many ideas for displaying your clock in different rooms. In the living room, hang it above the fireplace for a striking focal point.
In the kitchen, place it on a shelf or hang it near the dining area for a functional and stylish addition. In the bedroom, position it on a bedside table or mount it on the wall for easy visibility. Incorporating the clock into various home decor styles is simple with a little creativity.
Embrace the beauty of diy and enjoy the charm of your handmade wood wall clock in any room of your home.
Inspiration And Creativity With Wood Wall Clocks
Wood wall clocks offer a unique and inspiring touch to any space. With endless design possibilities, these diy projects ignite creativity and allow individuals to explore various themes and aesthetics. Whether your style leans towards rustic, modern, or minimalist, wood wall clocks can effortlessly blend in, adding charm and character to your home decor.
By utilizing different types of wood, finishes, and patterns, you can create a clock that truly reflects your personal style and taste. You can experiment with incorporating different colors, shapes, and textures to ensure that the clock complements the overall design and ambiance of the room.
Whether you prefer a sleek and elegant look or a bold and eclectic statement piece, wood wall clocks are the perfect addition to any interior design project. Embrace your creative side and start exploring the endless possibilities of diy wood wall clocks today.
Frequently Asked Questions For Diy Wood Wall Clock
How Do You Make A Diy Wood Wall Clock?
Making a diy wood wall clock is easy and fun. Start by cutting a round shape from a wooden board, then sand and paint it according to your preference. Attach clock hands and numbers, and install a clock mechanism at the center.
Finally, hang your clock on the wall, and enjoy time ticking away!
What Tools Are Needed To Make A Diy Wood Wall Clock?
To make a diy wood wall clock, you’ll need a few essential tools such as a jigsaw for cutting the wood, sandpaper for smoothing the edges, a drill for creating a hole in the center, a paintbrush for applying paint or varnish, and a clock mechanism kit that includes clock hands and numbers.
Can I Customize The Design Of My Diy Wood Wall Clock?
Absolutely! That’s the beauty of making your own diy wood wall clock. You have the freedom to customize the design to match your personal style and home decor. You can experiment with different paint colors, shapes, and sizes of the clock to create a unique and personalized timepiece for your wall.
How Long Does It Take To Make A Diy Wood Wall Clock?
The time required to make a diy wood wall clock depends on your experience level and the complexity of the design. Typically, it can take anywhere from a few hours to a couple of days. However, with proper planning and organization, you can complete the project in a shorter time frame and enjoy your new clock sooner.
Do I Need Any Prior Woodworking Experience To Make A Diy Wood Wall Clock?
No, you don’t need any prior woodworking experience to make a diy wood wall clock. This project is beginner-friendly and can be completed by anyone with basic diy skills. There are plenty of online tutorials and step-by-step guides available that provide clear instructions, making it accessible to all skill levels.
Conclusion
A diy wood wall clock is not only a functional timepiece, but also a stylish statement piece for any room. By following these simple steps, you can create a unique and personalized clock that showcases your creativity and adds a touch of warmth and charm to your space.
The use of natural materials like wood gives a rustic and organic feel that is both timeless and trendy. Whether you choose to keep it simple with a minimalist design or go all out with intricate detailing, a diy wood wall clock is a fun and rewarding project that allows you to express your individual style.
So why not give it a try? Get your tools ready, unleash your creativity, and enjoy the satisfaction of creating something beautiful and practical with your own hands. Happy crafting!

Meet Aron Crock, a clock hardware expert with seven years of hands-on experience. Aron’s journey into the world of clocks began as a hobby, but his passion soon turned into a profession. He’s known for his deep understanding of clock mechanisms and is highly respected in the field. Aron’s dedication to making clocks tick with precision and his innovative ideas have made him a key player in the industry. He’s committed to pushing the boundaries of clock technology and leaving a lasting impact on the world of timekeeping. Aron Crock is a true clock enthusiast, and his expertise shines through in his work.